NVXui 14 Pro MTZ Theme for MIUI and HyperOS
NVXui 14 Pro
Description
Official account: NVX Themes
Telegram: @nvxthemes (feedback)
*************
Reminder: If there is any abnormality after applying the theme globally (the status bar does not change, the lock screen does not take effect, etc.), please restart the phone to solve it!
*************
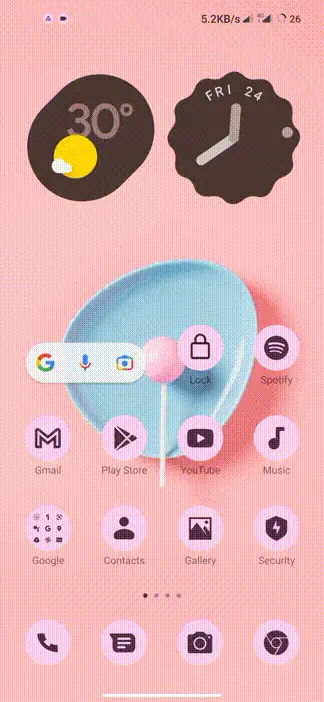
[Depth of field wallpaper] is the design highlight of this theme (depth of field wallpaper is a part of the time that the wallpaper will cover, and the time is very beautiful as if it is integrated into the wallpaper). To ensure the full effect of the theme, please apply the theme globally. The theme has built-in 8 depth-of-field wallpapers, which can be switched in the lock screen setting interface, and the desktop wallpaper will be synchronized with the lock screen wallpaper.
*************
Join our telegram channel for complete details of this theme - ⚠ Please do not copy the theme and copyrighted with attached files inside the theme with psd fle, otherwise you will be held legally responsible.
How to Install NVXui 14 Pro
How to Download ' NVXui 14 Pro' Through Theme store
- Start by clicking on the "Download from Theme store" button.
- An open window will appear; please select the Theme store.
- If you don't see the theme store app, you can try opening it through the different browser.
- Watch a tutorial on how to open the themes link in case it's not opening.
- After successfully opening the theme store, click on the download button.
- Wait for the download to finish.
- Apply the downloaded NVXui 14 Pro theme and enjoy.
How to Install & Apply 'NVXui 14 Pro' MTZ Theme permanently (HyperOS global)
-
Download MTZ Installer Pro APK from here:
Download APK - Open Google Play Store → Profile → Play Protect → Turn it OFF (required for accessibility permission).
- Enable Install from Unknown Sources for your browser or file manager.
- Install the downloaded APK and open MTZ Installer Pro.
- Download your desired .mtz theme file.
- Tap on Select MTZ File and choose the theme file.
- Click Install / Apply.
- Open Themes App → Go to My Themes → Apply the theme.
- For permanent apply: Open Recent Apps → Long press app → App Info (Gear Icon).
- Enable "Allow Restricted Settings".
- Go to Accessibility → Downloaded Apps → Enable Hyper Theme Service.
- Return to app → Tap Ignore Battery Optimization → Select No Restrictions.
- Open Recent Apps and Pin MTZ Installer Pro.
- Note: Theme will remain applied permanently unless the app is closed or killed.
How to Apply ' NVXui 14 Pro' MTZ File Using MTZ Tester
- Download MTZ Tester from the Google Play Store and open the app.
- Inside MTZ Tester, tap on "Choose MTZ."
- When prompted, browse to the directory where your NVXui 14 Pro MTZ file is located.
- Select the NVXui 14 Pro MTZ file from your storage.
- Tap the "Apply" button to set the chosen NVXui 14 Pro MTZ theme.
- If you are a Global Theme Store user, you might be asked to select the MTZ file again.
How to Permanently Apply ' NVXui 14 Pro' MTZ File in HyperOS custom Rom
- Download the NVXui 14 Pro theme from our website. In case you encounter issues with MTZ file downloads, we recommend watching our tutorial for assistance.
- Open the Themes app on your HyperOS custom ROM and select "My Account."
- In the "My Account" section, you will find a list of all the themes you've downloaded.
- Scroll down to the bottom of the list, where you will find an "Import" button. Click on it.
- Select the downloaded NVXui 14 Pro MTZ theme, and then apply it to customize your device's appearance permanently.
How to Install ' NVXui 14 Pro' on HyperOS using Theme Editor (Temporary)
- Download the NVXui 14 Pro MTZ theme file from the provided link above.
- Download "HyperOS Theme Editor" from the Google Play Store.
- Open the "HyperOS Theme Editor" app on your device.
- Select the "Browse" option and locate the NVXui 14 Pro MTZ file you downloaded earlier.
- Select the "Start" option to begin the theme installation process.
- Next, select the "Next" option to proceed with the installation.
- Now, select the "Finish" option to complete the installation process.
- A message will appear, prompting you to install the theme. Select the "Install" option to confirm.
- The NVXui 14 Pro theme has been successfully installed. Go to the Theme Store, and you will see the third-party theme you installed. Click on it and select "Apply."
How to Apply ' NVXui 14 Pro' Using Theme Swap
Note: Your theme will be applied but it will not show as applied in your theme center
- Go to the Play Store and install "Theme Swap."
- Open Theme Swap and click on the "+" plus button at the bottom of the app interface.
- Select the .mtz file of the NVXui 14 Pro theme you want to install. Click on the Hamburger Menu at the top left corner for the File Manager.
- Tap "OK" and wait for the file to be unpacked.
- Click on the NVXui 14 Pro theme name and select "Theme Pack" and then "Apply."
- A prompt will appear: "Theme Packed. Apply Now." Click "Yes" to apply the theme.
- And there you go! Your NVXui 14 Pro third-party theme has been successfully installed.